
Define a useful touch before you drive
Choose a target area and a possible follow-up before approaching the ball. A target can be the opponent's half, a space away from the defender, or a route along the side. It does not have to be the goal. This turns an aimless collision into a decision you can review: did the ball move toward the selected area, and could your car reach a useful next position?
Distance alone is a poor measure of control. A ball that travels far may be easy for the opponent to collect, while a short touch can keep it within your reach. During free play, set a modest target and observe both objects after impact. Avoid assigning yourself a success simply because you made contact; record whether the contact served the intention you chose.
Build the approach line early
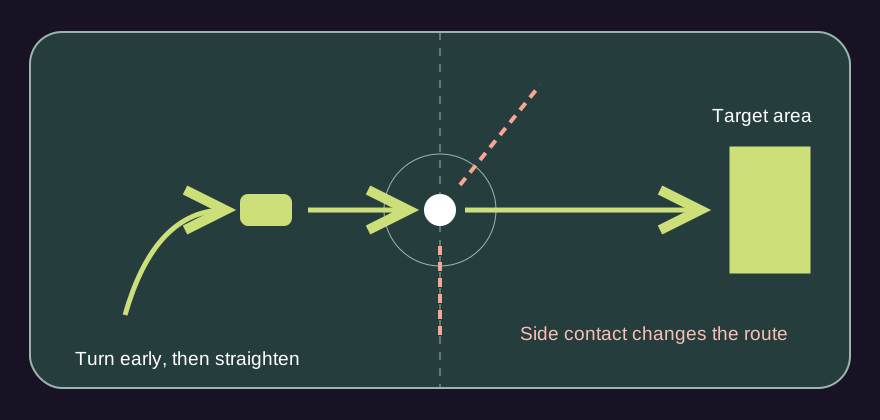
Imagine a line from the target back through the ball. Place your car on the continuation of that line when there is space to do so. Make the wide part of the turn before the final approach, then straighten the car. Steering hard at contact is usually a sign that you left the alignment decision too late.
If the ball is moving, aim for where contact will be possible rather than where the ball was when you began steering. Start with a stationary ball so you can understand the geometry first. Then introduce a gently moving ball in a separate exercise. Mixing different ball speeds into every attempt makes it harder to identify why a touch changed direction.
Separate speed from direction
Direction sets your intended line, while speed changes how much time you have to adjust and recover. Begin without boost. Add one short burst only after you can repeat the same line at ordinary driving speed. If the car goes past the ball, reduce the approach speed before changing the camera or blaming the control sensitivity.
Braking is part of the touch, not a failure to attack. Releasing throttle and applying reverse can help you arrive at a speed that leaves another action available. Try to make the speed adjustment while there is still room in front of the car. A last-moment correction often arrives after momentum has already committed you to the collision.
Choose a soft touch or a clearance deliberately
A soft touch is useful when you have space and want to stay close to the ball. A clearance is useful when you need to move danger away from your own goal. Those are different intentions, so the same outcome should not be judged by the same standard. A long ball into the side may be a successful defensive clearance and a poor possession touch.
Before each attempt, say the intention in a short phrase: keep close, move wide, or send forward. Afterward, compare the outcome with that intention. In a real match you will not have unlimited time to plan, but practicing explicit choices helps you recognize the available options before the defender reaches you.
Watch your car after the collision
The first touch includes the recovery. If your car crosses in front of the ball and blocks your own next approach, circle back into a useful line rather than forcing a second contact from the wrong side. If the ball moves away toward the wall, decide whether you can reach it before the opponent. Losing that race may make defending more useful than chasing.
Use the camera to keep the ball visible, but also notice where your wheels are pointing. Ball camera can show the next play while your car is still travelling across it. A short check of your driving line can prevent another rushed turn. Avoid changing view repeatedly during contact; settle the view before the last part of the approach.
Run a ten-attempt comparison
In free practice, pick one starting area and one target. Make five attempts with steady throttle and five with a short boost on the straight portion of the approach. Keep the camera and starting arrangement as consistent as you can. Reset between attempts rather than treating a chain of unrelated bounces as ten comparable trials.
For each attempt, write down three observations: target reached, useful follow-up available, and the most obvious reason for failure. Those reasons might be side contact, too much speed, or an early camera switch. Ten attempts are a practice block, not a scientifically validated sample. Do not describe a result as a general shooting rate unless you also explain the exact setup and limitations.
If you score six target hits, you can record six out of ten for that particular block. Do not add an invented baseline or claim that the exercise caused an improvement. Repeat the same arrangement in a later session if you want a more meaningful comparison. The practice plan has a blank record you can copy.
Transfer one change into a match
Start a solo duel and look for an uncontested ball. Apply just the approach adjustment you practiced, such as making the turn earlier. You may have fewer controlled opportunities because the opponent can interfere. Treat that difference as part of the exercise: choose when there is enough space for a possession touch and when a safer clearance is necessary.
In multiplayer, ask a friend to begin as a passive defender, then add pressure gradually. Explain where you intend the touch to go so you can discuss what happened afterward. If both players attack immediately, the session becomes a normal duel and stops isolating the first-touch decision. Use room free practice to coordinate the setup.
Finish the session with one concrete conclusion about your own attempts, not a universal rule. “I overran the ball when boosting through the turn” gives you something to test tomorrow. “Boost is always bad” removes useful options and ignores context. Controlled practice should help you choose among actions, rather than turn one drill into a restriction on every play.